Modifying Users with Quick Profile Update
- From the Administration menu, select Users > Quick Profile Update.
- Search for users you wish to update, either by Location or Username. Leave both criteria blank to return all users you oversee.
- Search by Location: Enter the Location Code, if known, or click Select a Location to launch the Organization Picker. This returns all users associated with that location and entries for each of their profiles, if there is more than one. Working from the user list, you will be able to update one user/profile combination at a time.
- Search by User: Enter the Username, if known, or click Choose a User to launch the User Picker. This returns profile entries for a single user.
- Click Search.Note: Search results are restricted to the administrator’s highest organizational level. An administrator with a profile at the Location level would only see users from that Location, while administrators at the Division level would see users across the Locations associated with their Division. Users with multiple profiles are listed as separate items in the result set, allowing the administrator to take action separately on each profile.
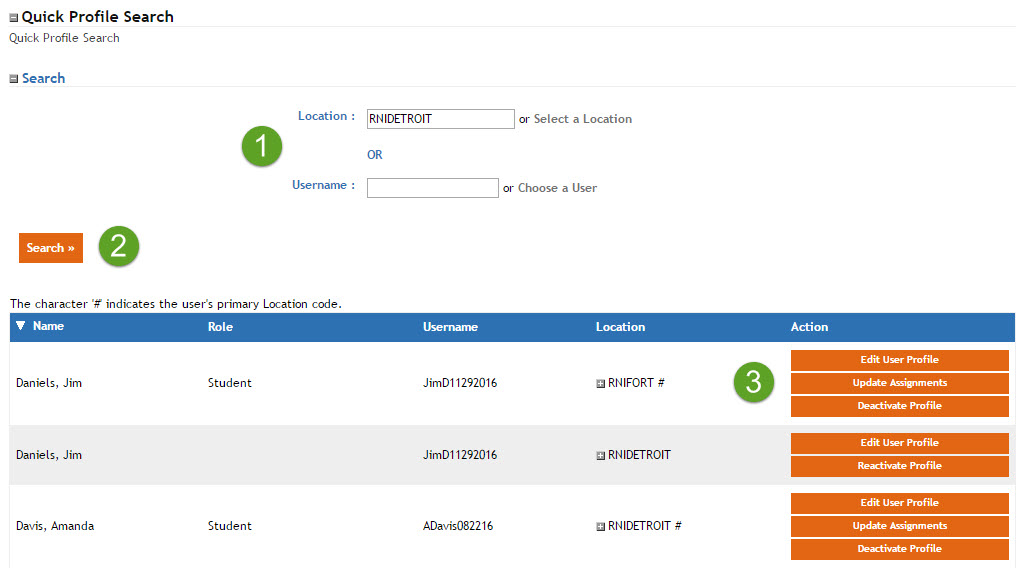 |
- From the search results, take the desired action for any user that requires an update.
- Edit User Profile: Open the user’s current profile information for review or manual modifications.
- Update Assignments: Instructions provided below.
- Deactivate Profile: Visible for Active profiles. End date the user’s profile, rendering that particular Location assignment inactive. If that profile were the user’s only or last active profile, the system will automatically deactivate the user’s account.
- Reactivate Profile: Visible for Inactive profiles. Removes the end date on the profile, making it active again. If the user’s account were completely inactive, this change will cascade to reactivate the user’s account as well.
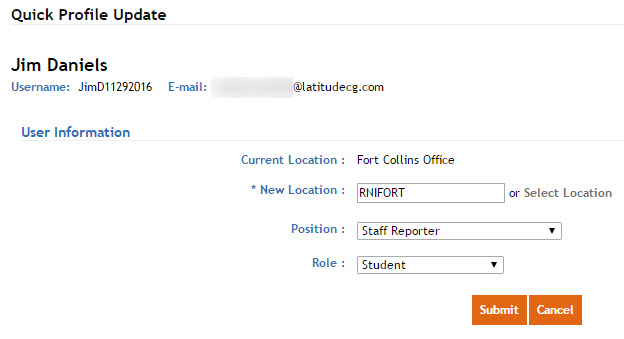
Update Assignments
Clicking the Update Assignments button opens in a new window with Location, Position, and Role information for the selected Profile. Make changes as described below.
- New Location: Enter the new Location Code or click Select Location to open the Organization Picker. If the changes only involve the position or role, it is not necessary to alter this entry.
- Position: Select the appropriate position from the drop-down list, if a change is required.
- Role: Select the appropriate role from the drop-down list, if a change is required.
- Click Submit. The system will indicate if the update was successful. You can then close the window and return to the search results to continue making changes, as needed.
Selecting a New Location automates four major tasks in the LMS.
- The selected profile data (previous location, position, and role) is end-dated with today’s date.
- The new profile assignments are made Primary.
- The modified user receives a message titled “LMS User Profile Updated” that lets them know a system administrator has modified their account. Portal administrators have the ability to modify or inactivate the system default messages for this event under Site Management > Edit Messages. The message name is “User Profile Updated – Quick Profile Update”.
- Depending on which option is selected under Site Management > LMS Information > Inactive Profile Enrollments, all incomplete course transcripts (e.g. Scheduled or Launched) tied to their previous location are either cancelled or moved to the new location.
Note: Users are notified of course cancellations, but the message/email will not indicate why. Exploring the user’s training history will reveal a “Cancel [date] by LMS Automated Processing” message. The completion date shown represents the date enrollment was cancelled.